Chromecast Device Authentication
Just recently, there was a high profile Chromecast outage, affecting second generation (Chromecast 2) devices. This happened because The Chromecast 2’s device authentication certificate has expired. This gave me an excuse to revisit some older content that I never got around to publishing, about how one can spoof the Device Authentication process - the same process that failed here.
My initial project resulted in a partially-working Chromecast Receiver, written in Go (code here). This implements enough of the Google Cast protocol to receive screen mirrored content from Chrome. However, this post focuses on a particular aspect of that project, which is how a third party Google Cast implementation can masquerade as a genuine Chromecast receiver.
Contents
- Introduction
- Google Cast Protocol
- Device Authentication
- Aside: Chromecast Outage
- Problem Statement
- Root Access
- Signature Generation
- Conclusion
- References
Introduction
If you’ve used a Chromecast before, you may be familiar with the Cast extension in Google Chrome (now built in to the browser). You may have even used the Cast functionality available on an Android device, to mirror your screen or play a video on a Chromecast.
Or perhaps, you’ve never seen a Chromecast. This is what a second generation Chromecast looks like:
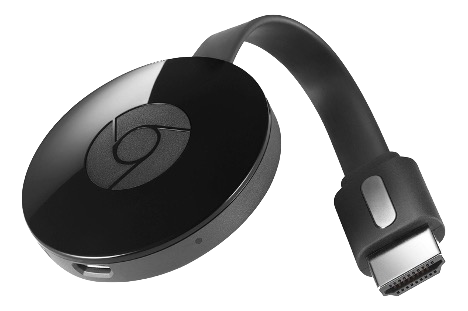
While the Chromecast design has been through a number of iterations, the basic concept remains the same. It’s a small USB-powered device, that you connect to your TV via HDMI. Basic capabilities include Wi-Fi, Bluetooth, and hardware accelerated video decoding, all in a very compact package. Chromecast also offers some support third-party apps, which run on a minimal web browser.
Google Cast Protocol
The protocol underlying all of this is called Google Cast. This is Google’s proprietary protocol for launching and controlling applications on a Chromecast device, and for sharing video and audio content to Chromecast-compatible devices. While our main focus in this post is device authentication, we’ll touch upon how the Google Cast protocol has been designed to accomodate custom Chromecast apps.
But first, we should talk about the difference between Chromecast Senders and Chromecast Receivers.
Senders and Receivers
As the name suggests, a Chromecast Receiver serves primarily to receive and play video/audio content. It can also be used to mirror the screen of a Chromecast Sender.
This isn’t all a receiver can do. An official Chromecast also bundles a stripped down web browser, which can be used to display web-based content. This makes the device capable of hosting third-party Applications. This allows the Chromecast to run third-party apps, which are effectively single page apps that can play video/audio from external sources such as YouTube. Third-party apps are typically controlled from a user’s mobile device, with a control channel established for sending messages back and forth.
The Google Cast protocol provides namespace and messaging semantics that make all of this work.
Protobuf
The messages used by the Google Cast protocol are defined using Google’s Protocol Buffers data serialisation format, more commonly known as Protobuf. Protobuf takes a single file that describes the serialisation format for a protocol, and uses that to generate language-specific bindings that marshall and un-marshall data in that format.

Image credit: Protobuf Overview from Protocol Buffers Documentation.
At a high level, each Google Cast message includes the following fields:
- Namespace
- Source ID
- Destination ID
- Payload (can be binary or a UTF-8 string)
The payload can be binary or text (assumed to be JSON formatted). The namespace tells us how to interpret the contents of the payload. The source ID and destination ID are included because a single communication channel may carry messages that are intended for different Chromecast applications.
You can see how these are defined in Protobuf format in the file cast_channel.proto from the Chromium source code. Note that this file is now part of the Open Screen Library, which aims to implement the Open Screen Protocol, Multicast DNS, and the Google Cast protocol.
Device Discovery
The next topic we should cover is Device Discovery. This is the mechanism by which a Chromecast Sender (e.g. your web browser or Android device) finds Chromecast Receivers on your local network.
Device Discovery relies on a protocol called Multicast DNS, or mDNS for short. As you may guess from the name, Multicast DNS is a variation on the traditional DNS protocol that powers the internet.
With traditional DNS it is possible for a host to query other services on a network using human-readable domain names (e.g. google.com). For example, when you enter tristanpenman.com into your web browser, DNS is used to find the IP address of the web server that contains the relevant content.
A limitation of DNS is that it is centralised, in the sense that we must know the IP address of a DNS server ahead of time. The DNS server must also know about devices on the network ahead of time, via manual configuration. Unfortunately, this doesn’t work well in local network scenarios where DNS may not be so easy to manage. The Multicast DNS standard is designed to overcome this limitation.
Multicast DNS
Multicast DNS, or mDNS for short, handles service lookup in a de-centralised fashion. Instead of directing queries to a specific DNS server, queries are broadcast on the local network using a multicast address. These queries request information about particular services available on the network. Broadcast packets are forwarded to all devices on the network, and any device is free to respond to any query.
To discover a Chromecast, a client will broadcast a query for devices that offer the _googlecast._tcp service. Chromecast devices on the local network will then broadcast a response listing their capabilities, and how to connect (IP and port). This is called ‘advertising’ a service. mDNS responses are broadcast to all devices on the local network, so it is possible for clients to discover new Chromecast devices passively, even they are not actively querying for them.
At startup, a Chromecast Receiver will advertise the existence of the _googlecast._tcp service, on port 8009. It will also respond to queries for the _googlecast._tcp so that new Chromecast Senders are able to find it when they are first started.
Once a Chromecast Sender has discovered a Receiver, it is free to connect to it on port 8009. Connections are secured using TLS, which is an important detail, as it relates to the Device Authentication mechanism that is part of the Google Cast protocol. We’ll come back to this shortly.
Device Authentication
A key challenge in implementing a viable Chromecast Receiver is Device Authentication. This is the mechanism by which a Chromecast Sender determines that a device is a genuine Chromecast, or an officially licensed Chromecast-compatible Receiver.
The way this works is that a Chromecast Sender issues a Device Authentication challenge immediately after connecting to a Chromecast Receiver. The Receiver is expected to extract the challenge payload, sign it cryptographically using a private key that is unique to the Receiver device, thus producing a valid Device Authentication response.
Google Cast connections are secured using TLS. At a minimum, this requires that a Chromecast receiver has a self-signed x509 certificate. While this certificate is self-signed, and therefore not part of a traditional PKI certificate chain, the Google Cast protocol provides another means by which this certificate can be verified as belonging genuine Chromecast device. That process is the focus of this post.
Motivation
Let’s start with the basics. We may ask: Why bother verifying the authenticity of a Chromecast Peer Certificate?
There are several reasons to do this:
- Google would look to maintain control over the Google Cast ecosystem. By verifying that a Peer Certificate belongs to a genuine Chromecast, or a licensed third-party device, Google can ensure that the availability of devices in the Google Cast ecosystem is well regulated.
- Users would like to know that the device they are connected to is in fact the device they expect. Without Device Authentication it is possible for an attacker to masquerade as another device on the network, possibly intercepting connections.
In a nutshell, a Device Authentication challenge allows a Chromecast Sender to verify that it is connected to a genuine, or officially licensed, Chromecast device, and that the connection has not been intercepted.
Peer Certificates
So how does this Device Authentication mechanism work?
I mentioned above that Google Cast TLS connections are secured using a self-signed x509 certificate. This certificate, hereafter called the Peer Certificate, is regenerated every 24 hours. On its own, this certificate offers little assurance that a user has connected to a genuine Chromecast device.
We need three things if we are to work around this limitation:
- The Chromecast receiver must be able to sign its Peer Certificate, using a private key that is fused in the CPU / SoC. We call this key the Device Private Key, and it has a corresponding Device Certificate, which can be found in the Chromecast file system.
- The Chromecast sender must be able to verify that the Peer Certificate was signed using the Device Private Key. It can do this using the public key contained in the Device Certificate.
- Finally, the Chromecast Sender must be able to verify the authenticity of the Device Certificate. i.e. that the Device Certificate was generated by an entity that is trusted by Google.
In the case of an official Chromecast, the Device Private Key is fused into the Soc (System on a Chip), and cannot be accessed directly by code running on the device. Instead, the CPU provides cryptographic instructions that allow it to sign a small amount of data (e.g a SHA256 hash) using the private key.
PKI
The second part of the process - verifying the authenticity of the Device Certificate - is achieved using PKI, or Public Key Infrastructure. PKI allows a series of certificates to verified, all the way up to a ‘root’ certificate. Together, the certificates forms a ‘chain of trust’.
In the case of Chromecast, there are three certificates that are included in this chain. The first is the Device Certificate - unique to the Chromecast device. The second certificate corresponds to an Intermediate Certificate Authority (or ICA). Each Chromecast generation has its own ICA. The third certificate is the Google Root CA Certificate.
The complete chain looks like this:
Device Certificate
        |
        |---------------> ICA Certificate
            verified by         |
                                |---------------> Root CA Certificate
                                    verified by
This is a lot to digest, so hopefully a diagram will help…
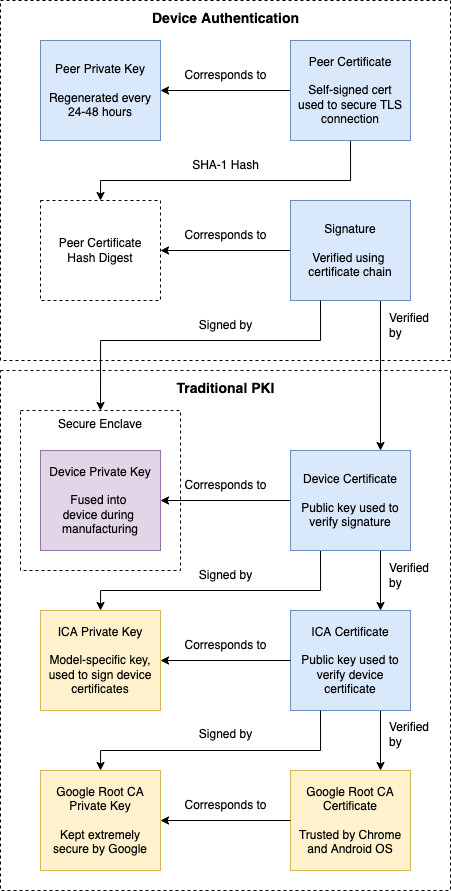
In this diagram, blue boxes represent information that must be known to the receiver software at runtime. This becomes more relevant when we implement Device Authentication ourselves. We can also see here that the Device Private Key is kept in a secure enclave, which can only be accessed indirectly by cryptographic CPU instructions.
ICA Certificates
The ICA Certificates are of particular interest, because they are shared across an entire product line. At the time that a Chromecast device is manufactured, it’s fused Private Key is signed using the ICA Private Key corresponding to this certificate.
We can use OpenSSL command line tools to inspect the ICA certificate:
Certificate:
    Data:
        Version: 3 (0x2)
        Serial Number: 1 (0x1)
        Signature Algorithm: sha1WithRSAEncryption
        Issuer: C=US, ST=California, L=Mountain View, O=Google Inc, OU=Google TV, CN=Eureka Root CA
        Validity
            Not Before: Dec 19 00:47:12 2012 GMT
            Not After : Dec 14 00:47:12 2032 GMT
        Subject: C=US, ST=California, L=Mountain View, O=Google Inc, OU=Google TV, CN=Eureka Gen1 ICA
        Subject Public Key Info:
            Public Key Algorithm: rsaEncryption
                Public-Key: (2048 bit)
                Modulus:
                    00:bc:22:80:bd:80:f6:3a:21:00:3b:ae:76:5e:35:
                    7f:3d:c3:64:5c:55:94:86:34:2f:05:87:28:cd:f7:
                    69:8c:17:b3:50:a7:b8:82:fa:df:c7:43:2d:d6:7e:
                    ab:a0:6f:b7:13:72:80:a4:47:15:c1:20:99:50:cd:
                    ec:14:62:09:5b:a4:98:cd:d2:41:b6:36:4e:ff:e8:
                    2e:32:30:4a:81:a8:42:a3:6c:9b:33:6e:ca:b2:f5:
                    53:66:e0:27:53:86:1a:85:1e:a7:39:3f:4a:77:8e:
                    fb:54:66:66:fb:58:54:c0:5e:39:c7:f5:50:06:0b:
                    e0:8a:d4:ce:e1:6a:55:1f:8b:17:00:e6:69:a3:27:
                    e6:08:25:69:3c:12:9d:8d:05:2c:d6:2e:a2:31:de:
                    b4:52:50:d6:20:49:de:71:a0:f9:ad:20:40:12:f1:
                    dd:25:eb:d5:e6:b8:36:f4:d6:8f:7f:ca:43:dc:d7:
                    10:5b:e6:3f:51:8a:85:b3:f3:ff:f6:03:2d:cb:23:
                    4f:9c:ad:18:e7:93:05:8c:ac:52:9a:f7:4c:e9:99:
                    7a:be:6e:7e:4d:0a:e3:c6:1c:a9:93:fa:3a:a5:91:
                    5d:1c:bd:66:eb:cc:60:dc:86:74:ca:cf:f8:92:1c:
                    98:7d:57:fa:61:47:9e:ab:80:b7:e4:48:80:2a:92:
                    c5:1b
                Exponent: 65537 (0x10001)
        X509v3 extensions:
            X509v3 Basic Constraints:
                CA:TRUE, pathlen:1
    Signature Algorithm: sha1WithRSAEncryption
    Signature Value:
        8b:d4:a1:b1:cf:5d:cd:7b:6c:48:4a:41:1f:53:2f:18:2d:32:
        45:ff:9e:ab:d3:73:3e:1f:22:d7:ea:fa:01:e6:73:03:0f:2b:
        c6:25:bb:a5:ee:c5:f5:45:cb:24:12:2a:ad:c2:5d:05:f4:7a:
        f5:c2:9b:10:16:5a:d1:0a:73:c5:16:39:a0:10:ca:d1:68:85:
        9e:fb:9e:26:83:8e:58:f3:77:a0:4e:e5:db:97:be:2d:00:5f:
        f5:94:db:b1:9d:65:6b:fd:f0:d1:04:51:df:cc:92:a6:99:2d:
        71:f5:4d:d5:23:fe:33:1c:a9:b4:ab:c5:bf:1a:b8:d1:80:ef:
        89:c9:e2:1f:9c:4c:48:3b:a2:fa:02:0a:dc:84:01:8a:87:02:
        fb:59:ee:a7:4c:04:7d:74:99:87:6a:25:44:ad:16:aa:ec:4e:
        35:1b:7c:7b:84:c9:b1:3f:e1:82:70:e5:0d:e7:d9:6d:fa:95:
        b6:c5:e4:1e:e8:11:9b:d8:b2:f3:a4:fd:13:f3:83:4f:f7:07:
        14:20:bb:22:a5:a6:8f:d6:b5:db:a9:74:78:e2:93:0d:e5:23:
        2f:05:17:e0:b2:97:67:34:4d:0f:9c:76:43:7b:a6:21:4a:56:
        05:f6:2a:7c:f2:7f:12:94:82:26:29:07:f0:0b:6c:6c:79:14:
        b0:74:d5:6c
This is the same certificate as viewed in Apple’s Keychain app.
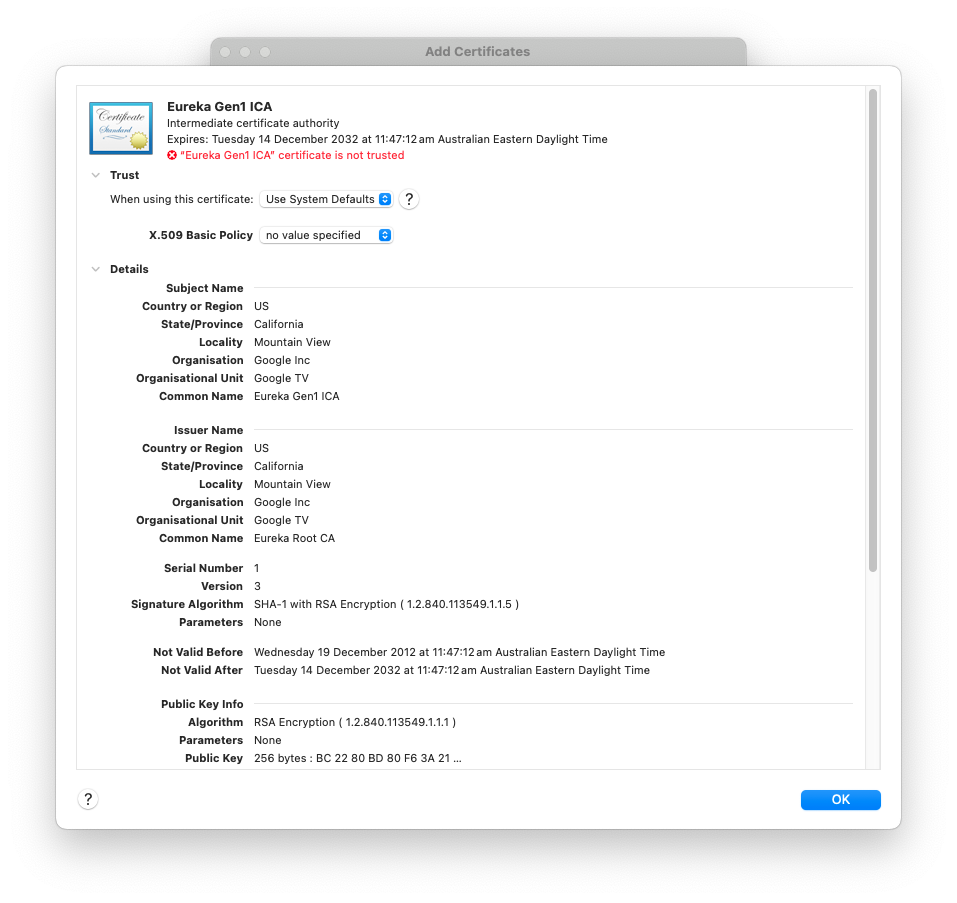
Here we can see the Common Name associated with the certificate (Eureka Gen1 ICA) - Eureka being the original codename for Chromecast.
Challenge Request
This gives us the pieces we need to under the Challenge Request.
When a client first connects to a receiver, it may issue a Challenge Request. This is a message that instructs the receiver to sign a hash of its Peer Certificate using the Device Private Key, and to respond with an x509 certificate chain that can be used to verify that this signature is valid.
Here is the overall process:
- The client re-hashes the Peer Certificate, then uses the Device Certificate to verify that the signature was generated by that particular receiver. i.e. the signature is verified using the device’s public key contained in the Device Certificate.
- The client then verifies that the Device Certificate was signed by an ICA corresponding to the particular model of Chromecast device. In the challenge response, the receiver is expected to provide an ICA Certificate for this purpose.
- Finally, the client verifies that the ICA Certificate was signed by a trusted Root CA. For this, it will use a Root CA certificate that is included with Google Chrome or Android OS.
Aside: Chromecast Outage
As an aside, we now have everything we need to know to understand the recent Chromecast outage.
If we simply take a look at the ICA Certificate used for second-gen Chromecast devices - specifically the Validity period - we’ll see that the certificate expired on 9th March 2025:
Certificate:
    Data:
        Version: 3 (0x2)
        Serial Number: 36 (0x24)
        Signature Algorithm: sha256WithRSAEncryption
        Issuer: C=US, ST=California, L=Mountain View, O=Google Inc, OU=Cast, CN=Cast Root CA
        Validity
            Not Before: Mar 12 16:44:39 2015 GMT
            Not After : Mar  9 16:44:39 2025 GMT
        Subject: C=US, ST=California, L=Mountain View, O=Google Inc, OU=Cast, CN=Chromecast ICA 3
        Subject Public Key Info:
            Public Key Algorithm: rsaEncryption
                Public-Key: (2048 bit)
                Modulus:
                    00:d1:de:fb:ad:8b:43:07:28:ae:56:2d:f2:73:2a:
                    1f:63:43:76:6d:8d:b8:d1:d4:90:29:1b:91:68:4a:
                    55:41:a0:d5:61:b4:ec:dd:ae:e1:fa:a7:b6:38:c4:
                    de:19:e1:33:4d:9a:29:f1:48:e2:6b:a7:2c:21:14:
                    22:3f:87:81:f3:71:2c:e6:43:1c:b8:d4:ec:cf:67:
                    2f:b2:a2:75:8b:10:bd:f9:e7:c9:5c:de:05:a9:b4:
                    86:b7:68:7d:a7:76:85:e2:65:b8:76:51:4f:b9:60:
                    5d:7e:2b:64:48:12:66:d9:a7:bb:7c:d7:48:88:8a:

                    <// SNIP //>
The reason it was so difficult for Google to respond to this issue is that second-gen Chromecasts were hard-coded to use this particular certificate.
Problem Statement
At this stage, we can begin to flesh out the problems that we need to solve:
- We need to gain access to the Device Private Key from a genuine Chromecast device. Failing that, we need to coax a device to sign a Peer Certificate for us.
- We need to find the Device Certificate that corresponds to the Device Private Key.
- We need to find the ICA Certificate that was used to sign the Device Certificate.
Given the statements above - in particular the restricted access to the Device Private Key - this may appear impossible.
Prior Work
While I was initially investigating the Google Cast protocol, I discovered other Chromecast Receiver implementations that did not appear to be officially licensed from Google. Somehow they have solved this problem, so I knew it would be possible to bypass or spoof the Device Authentication mechanism.
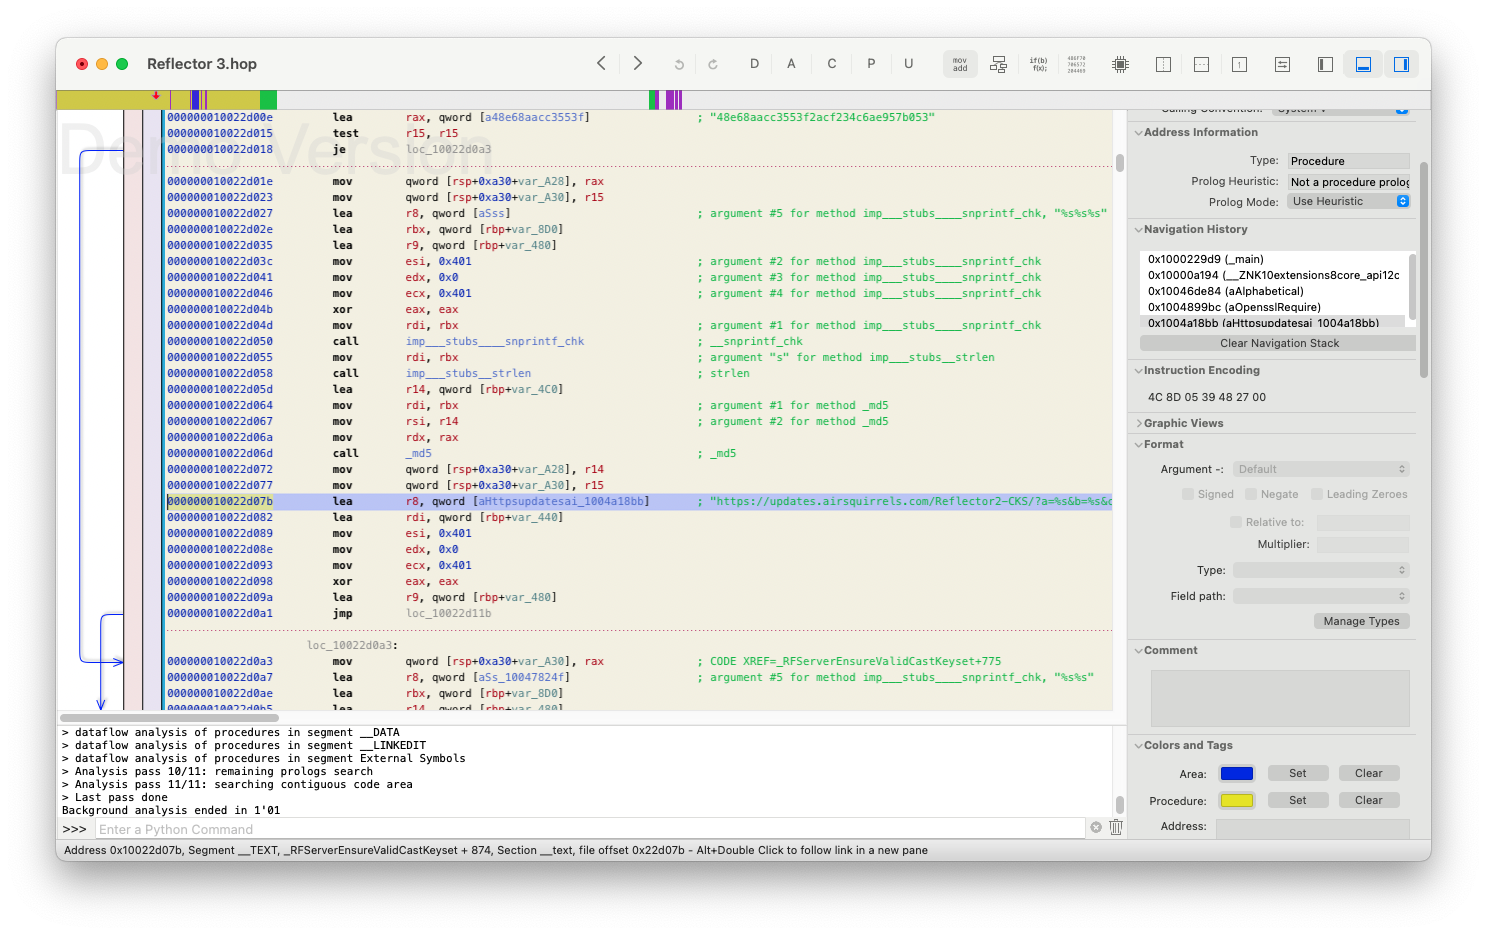
My investigation focused on two products, AirServer and Reflector. Using Wireshark and an executable reverse engineering tool called Hopper for macOS, I dug into how both products work internally. Ultimately, it was Reflector that allowed me figure out how to implement a viable Device Authentication mechanism.
Certificate Manifest
The Chromecast receiver functionality in Reflector depends upon something that I’ve been calling a Certificate Manifest. This is a misleading name, as it contains more than just certificates, but I haven’t been able to come up with anything better.
The Certificate Manifest provides all of the information contained in the blue boxes in the Device Authentication diagram shown earlier:
- Peer Private Key and Peer Certificate - Used to secure the initial TLS connection. Generated periodically by a Chromecast Receiver.
- ICA Certificate - This represents the Intermediate Certificate Authority (ICA) that issues device certificates. This is used for traditional PKI certificate chain verification. Each generation / product line of Chromecast has its own ICA.
- Device Certificate - This is a per-device certificate, corresponding to the private key embedded in the device’s secure enclave.
- Peer Certificate Signature - Used to ensure that the device is a genuine or licensed Chromecast Receiver. This is signed using the private key embedded within any genuine Chromecast device.
All together, that is five separate items that a receiver needs to pass Device Authentication.
TLS Server
The Peer Private Key and Peer Certificate are the most basic requirements here. These are needed to start a TLS server that can accept connections on port 8009.
Once we are able to accept connections on port 8009, the next problem we need to solve is the Device Authentication Challenge. This is where a Chromecast sender expects us to prove that our receiver is a genuine, or licensed, Chromecast device. To do this, we need to figure out how to sign the Peer Certificate using the Private Key that is embedded in a real Chromecast device.
And in order to do this, we’ll need to gain root access to the Chromecast…
Root Access
A little research was enough to discover that there is a way to gain root access to a Chromecast. The catch is that this was only possible with a first-generation Chromecast, and even then, only one that had not been updated to the latest firmware (i.e. never connected to the internet).
Amazingly, I was able to find not one, but two mint condition first-gen Chromecast units online, and quickly ordered these for safe keeping:
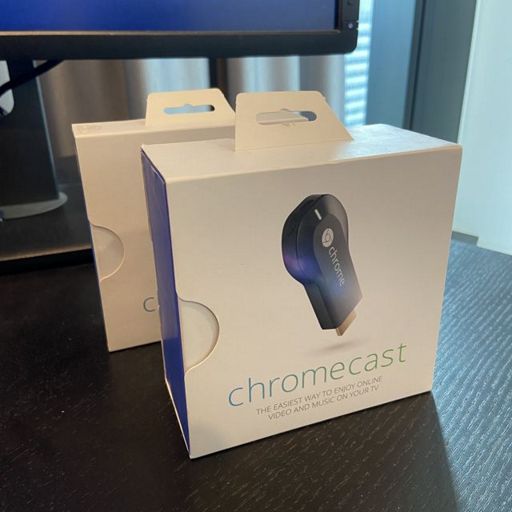
I apologise for hoarding these. For this project, it was crucial that I had a backup device, in case the first was bricked while doing research. Of course, I have been very careful to avoid connecting either device to the internet with the stock firmware. Even a few minutes of internet connectivity would be enough for the device to download a firmware update that closes the vulnerability allowing root access.

The first generation Chromecast was not just physically vulnerable, but at the time, the Chromecast firmware was also vulnerable to an attack in which the Chromecast could be booted using an external USB device.
Eureka-ROM Firmware
Eureka-ROM is a third-party Chromecast ROM, maintained by Team Eureka. It includes features such as ADB, SSH and Telnet access, and DNS customization. Other parts of the OS remain unchanged. The ROM is playfully named after the original codename for the Chromecast project: Eureka.
Eureka-ROM also includes and a web-based control panel, which can be useful for debugging rooted devices:
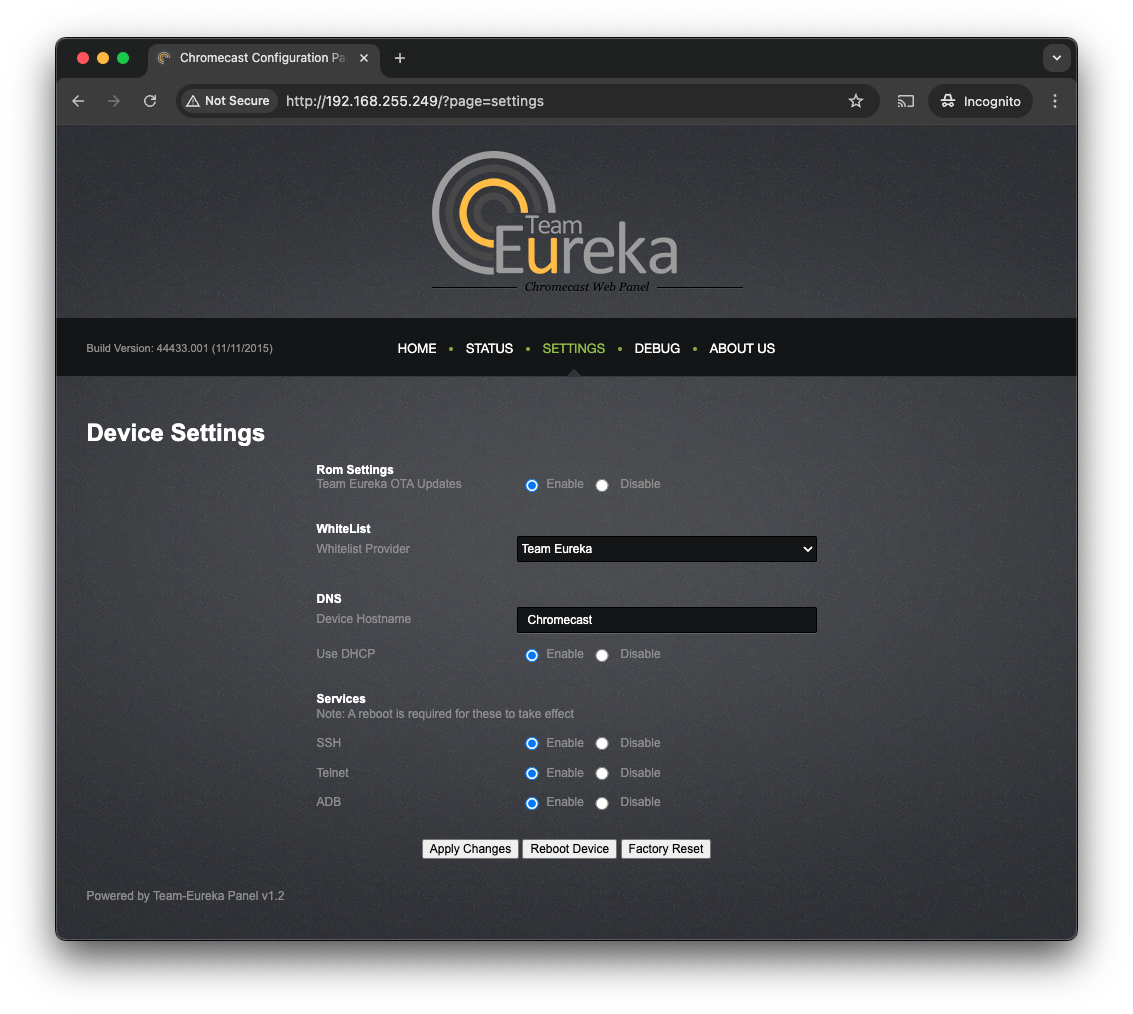
Crucially, we’ll be relying on ADB and SSH access in order to run our own binaries on a rooted Chromecast.
Flashing Process
The actual process of rooting the device is interesting. The process requires a Teensy++, a simple USB-based micro-controller development board that we will connect to the Chromecast via USB. The Teensy++ allows us to boot the Chromecast into a mode that allows a new firmware image to be written to the device.

The first thing we need to do is program the Teensy++ with firmware (called HubCap) that allows it to communicate with the Chromecast. This is done by connecting the Teensy++ to a PC and using Teensy Loader to program the micro-controller. We also need to prepare a USB thumb drive with the firmware (Eureka-ROM) that we intend to install on the Chromecast. This is not a regularly formatted USB thumb drive. Instead, we need to use a disk imaging tool to write the firmware image to the drive.
With all this ready, we can connect the Teensy++ to the Chromecast, using an externally-powered USB OTG cable:
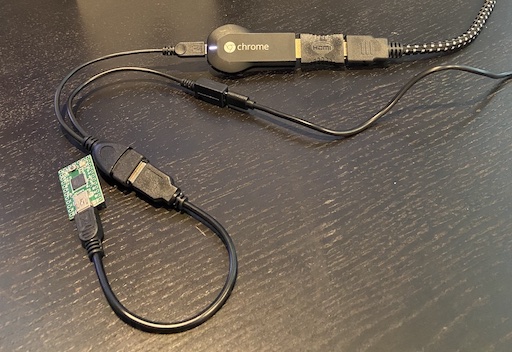
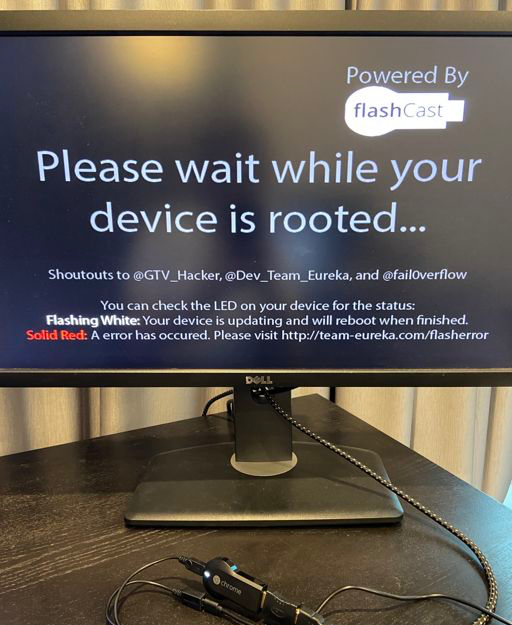
Once the Chromecast has been booted into a mode that allows us to upload new firmware, we replace the Teensy++ with the USB thumb drive containing our custom firmware. Updating the firmware on the Chromecast takes up to 10 minutes, so when I was testing this, I would just set a timer and go do something else in the meantime. If everything has worked as intended, when we next boot the Chromecast, we’ll see this lovely splash screen:
Gotchas
It’s important to point out that, at time of writing, these steps will render your Chromecast useless, unless you go through the steps to re-flash it with official firmware.
I found that versions 17977.001 and 44433.001 of Eureka-ROM are both too old to be compatible with modern versions of Google Chrome. My attempts to upgrade to later versions were entirely unsuccessful. As such, it’s best to think of any Chromecast used for signature generation as a donor device.
For reasons explained below, I settled for version 17977.001 of the Eureka-ROM firmware.
Signature Generation
We’re almost there!
As mentioned above, a Chromecast Receiver is expected to generate a new TLS private key and self-signed certificate at least once every 48 hours. I generally refer to these as the Peer Private Key and Peer Certificate.
When a Device Authentication Challenge is received, we need to calculate the SHA1 hash of the Peer Certificate (this will be X bytes long) and sign this using Device Private Key.
Chromecast Tools
When first researching this project, I found a GitHub repo called chromecast-widevine-tools. This contains source code for tools that can be run on a rooted Chromecast in order to use the cryptographic functionality of the device, including signing a hash using the private key. I have no idea how the original author came up with any of this, but remarkably, it works.
Compiling these tools was a little tricky, because I had to obtain an appropriate toolchain, and set up the necessary development packages on a Linux system. At the conclusion of this project, I created a fork of this repo, chromecast-tools, which contains just the code needed to sign data using the private key. This makes it sufficient for Device Authentication.
My fork also includes a Dockerfile to make compiling a bit easier:
git clone git@github.com:tristanpenman/chromecast-tools.git
cd chromecast-tools
docker build . -t chromecast-tools
docker run -v `pwd`:/workspace --rm -it chromecast-tools /bin/bash
make
This produces a binary called gtv-ca-sign, which can be run on the Chromecast device.
Aside: Toolchain Compatibility
At this point, it’s worth mentioning some issues that I had with toolchain compatibility.
In the Gotchas section above, I mentioned that I tried versions 17977.001 and 44433.001 of the Eureka-ROM firmware and ultimately settled for 17977.001. The reason for this is toolchain compatibility.
A toolchain contains all the libraries, headers, and other supporting files required to compile programs for a specific architecture and operating system. When cross-compiling (as we are here) it is crucial that the toolchain is compatible with the libraries and OS installed on the target device.
What I found is that between versions 17977.001 and 44433.001, some kind of breaking changes had occurred. The result is that the gtv-ca-sign binary would be compiled successfully, but running it on the device would fail with an error like this:
gtv-ca-sign: not found
I chose not to investigate this further, and simply revert to the working firmware.
Mining Certificates
This is the final piece of the puzzle.
The first step in successfully passing Device Authentication is to start a TLS server using a Peer Private Key and self-signed Peer Certificate that have been generated within the last 24 hours, and are valid for no longer than 48 hours. A Chromecast Sender will immediately close the connection if these conditions are not met!
We also need to generate a cryptographic hash of the Peer Certificate, which we will sign using the Private Key belonging to our rooted Chromecast.
I wrote a little Python script to generate an appropriate Peer Private Key and Peer Certificate. This script also calculates the SHA256 hash of the Peer Certificate:
from OpenSSL import crypto
from datetime import date, datetime, time, timedelta, timezone
import hashlib
import os
import sys

today = date.today()

def get_iso_timestamp(day_offset):
  timestamp_string = datetime.combine(today + timedelta(days = day_offset),
                                      time(0, 0, 0),
                                      tzinfo=timezone.utc).strftime('%Y%m%d%H%M%S')
  return str.encode(timestamp_string + 'Z')

# Generate a key
k = crypto.PKey()
k.generate_key(crypto.TYPE_RSA, 2048)

# Start building our certificate
cert = crypto.X509()
cert.get_subject().CN = 'FakeChromecast'
cert.set_serial_number(12345678)
cert.set_pubkey(k)
cert.set_issuer(cert.get_subject()) # self-signed

# Set the validity period
cert.set_notBefore(get_iso_timestamp(-1)) # 24 hours ago
cert.set_notAfter(get_iso_timestamp(1)) # 24 hours from now

# Sign the cert
cert.sign(k, 'sha1')

# Write the cert to a file
f = open(os.path.join(target, 'peer.crt'), 'wb')
f.write(crypto.dump_certificate(crypto.FILETYPE_PEM, cert))
f.close()

# Write the key to a file
f = open(os.path.join(target, 'peer.key'), 'wb')
f.write(crypto.dump_privatekey(crypto.FILETYPE_PEM, k))
f.close()

# Print out a SHA256 hash of the Peer Certificate
der = crypto.dump_certificate(crypto.FILETYPE_ASN1, cert)
sha = hashlib.sha256(der).hexdigest()
print(sha)
That last bit (printing the hash) is important, because we need to sign the SHA256 hash of the Peer Certificate using the private key embedded in our rooted Chromecast. We do this by passing the hash to gtv-ca-sign (replacing <HASH> with the hash that was printed by the script):
adb shell /tmp/gtv-ca-sign --hash <HASH>
This will produce the signature that we need when responding to a Device Authentication challenge!
Conclusion
When I first started this project (several years ago) it was intended to be a small proof-of-concept. In the years since, it became an interesting personal project that challenged me to learn Go. While my implementation could only ever be considered a toy, it helped me to internalise important concepts relating to PKI and the security of physical devices.
This has become relevant once again, courtesy of the recent Chromecast outage. Crucially, doing what we can to spread knowledge about how these security mechanisms work will help ensure that future devices are designed without such vulnerabilities.
References
Open source projects relevant to this post:
- Go-Cast - My own Chromecast Receiver implementation, that I wrote while learning Go. It implements Device Authentication, basic app discovery, and rudamentary screen mirroring using VP8. At time of writing, the RTP implementation is still very buggy…
- Chromecast Tools - My fork of chromecast-widevine-tools that contains just the code needed for generating certificates and signing Peer Certificates.
- Open Screen Library - Google’s Open Screen Library, which includes implementations for Google Cast Senders and Receivers. This is more complete than my Go implementation, and would be an excellent reference for those wanting to implement Google Cast themselves.
Related projects found during the proof-of-concept phase:
- node-castv2 - An implementation of the Google Cast protocol in JavaScript
- node-castv2-client - A corresponding client implementation written in JavaScript
Interesting reading: