Porting Asteroids to the Nintendo 64
It was during Melbourne’s record-breaking 2020 lockdown that I rediscovered my interest in retro console development. While I had previously dabbled in homebrew for consoles from the 16-bit era, it was now the later generation consoles, such as the Nintendo 64 and SEGA Dreamcast, that caught my interest. These consoles represented the earliest days of the 3D era, each with their own quirks.
This post details my experiences porting Asteroids to the Nintendo 64, and includes some pointers on how you can get started with N64 Homebrew.
Contents
- Introduction
- Inspiration
- N64 Architecture
- Emulation
- Dev Enviornment
- Real Hardware
- N64 Operating System
- NuSystem
- Display Lists
- Sound Tools
- Closing Thoughts
Introduction
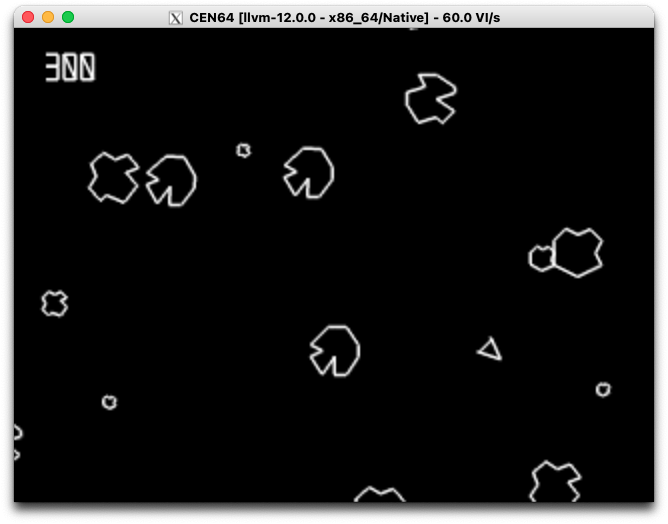
It turns out that Nintendo 64 homebrew is now very accessible, with both of official and open source SDKs available. After discovering this, I tried porting my Asteroids clone, with the goal of having it run on real hardware. All of the code for this project can be found on GitHub, and a working N64 ROM can be found here.
This is what it looks like in action:
Inspiration
I first became aware that there was an active N64 homebrew scene after accidentally discovering James Friend’s goose64, a de-make of Untitled Goose Game. His code made use of the official N64 SDK and the Windows-based development kit that many game developers would have used back in the 90s.

I thought the demake project was a cool idea, and the fact that it was open source was extremely valuable in getting me started on my own projects. While exploring James’ GitHub profile, I found that he had a number of repos dedicated to N64 Homebrew. In particular, the n64-sdk-demo repo is a good starting point for budding N64 developers.
Another good starting point is the n64 and N64Homebrew subreddits, and Discord:
Lets move on to take a look at the Nintendo 64 architecture…
N64 Architecture
The Nintendo 64 is built around two main processors. The main CPU is based on the MIPS R4300i, clocked at 93.75 MHz. The CPU is complemented by the RCP (or Reality Coprocessor) which is used for graphics and audio.
The system includes two Rambus RAM chips (RDRAM), providing a total of 4.5MB of system memory (0.5MB reserved for the RCP). System memory can be expanded to 9MB (8MB usable) with the N64 Expansion Pak. The N64 features a Unified Memory Architecture, meaning that the same memory is used by both the CPU and RCP.
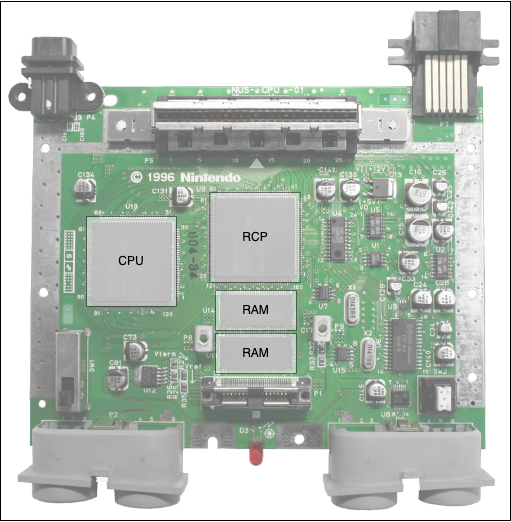
CPU
The R4300i is a 64-bit CPU, and is considered the successor to the 32-bit R3000, the CPU that was used in the original Sony PlayStation.
RCP
The RCP was designed by SGI, specifically for the Nintendo 64. It consists of two main cores. One is the Reality Signal Processor, or RSP. The RSP is a vector processor based on the MIPS R4000 design and clocked at 62.5 MHz. The other is the Reality Display Processor, or RDP. While the RSP is primarily used for vector processing and mixing audio, the RDP is responsible for rasterisation.
The RCP is also used to handle joystick/controller inputs, and serves as a DMA controller for memory access. The importance of this chip is highlighted by its position on the N64 motherboard, where it occupies an even more central location than the CPU.
If you want to learn more about the N64 Architecture, then I can highly recommend Rodrigo Copetti’s write-up:
His website is an absolute treasure trove of information about retro game consoles!
Graphics
One misconception that I held, going into this project, was that the N64 graphics APIs would closely resemble OpenGL (since both APIs were developed by SGI). In practice, there were a number of key differences that needed to be taken into account.
The N64 graphics APIs are based on the concept of a Display List, which is submitted to the RSP to be processed, and then rasterised by the RDP. Display Lists are limited in size, and must carry the geometry that is to be drawn. This is quite different to the OpenGL 1.x approach, where the GL implementation can be thought of as a giant state machine, relying on direct calls to glLine, etc, or otherwise referencing vertex arrays in memory.
Display Lists are discussed in more detail later in this post.
As a result, my existing graphics code would have to be re-written to work with the N64 graphics pipeline. The biggest challenge I ran into was porting my rudimentary font system. I quickly ran into resource limitations when naively copying font data into Display Lists, and had to put some effort into doing this more efficiently.
Here is an example of some graphics code from my n64-homebrew repo on GitHub:
// A static array of model vertex data.
//
// This includes:
//  - position (x,y,z)
//  - texture U,V coords (called S,T in the SDK)
//  - vertex color values in r,g,b,a form.
//
// As this data will be read by the RCP via direct memory access,
// which is required to be 16-byte aligned, it's a good idea to
// annotate it with the GCC attribute `__attribute__((aligned (16)))`,
// to force it to be 16-byte aligned.
//
Vtx vertices[] __attribute__((aligned (16))) = {
  //  x,   y,  z, flag, S, T,    r,    g,    b,    a
  // front
  { -64,  64, 64,    0, 0, 0, 0x00, 0xff, 0x00, 0xff  },
  {  64,  64, 64,    0, 0, 0, 0x00, 0x00, 0x00, 0xff  },
  {  64, -64, 64,    0, 0, 0, 0x00, 0x00, 0xff, 0xff  },
  { -64, -64, 64,    0, 0, 0, 0xff, 0x00, 0x00, 0xff  },
  // back
  { -64,  64, -64,   0, 0, 0, 0x00, 0xff, 0x00, 0xff  },
  {  64,  64, -64,   0, 0, 0, 0x00, 0x00, 0x00, 0xff  },
  {  64, -64, -64,   0, 0, 0, 0x00, 0x00, 0xff, 0xff  },
  { -64, -64, -64,   0, 0, 0, 0xff, 0x00, 0x00, 0xff  },
};

void stage1_draw_box()
{
    // load vertex data for the triangles
    gSPVertex(gfx_list_ptr++, &(vertices[0]), 8, 0);

    // depending on which graphical features, the RDP might need to
    // spend 1 or 2 cycles to render a primitive, and we need to
    // tell it which to do
    gDPSetCycleType(gfx_list_ptr++, G_CYC_1CYCLE);

    // use antialiasing, rendering an opaque surface
    gDPSetRenderMode(gfx_list_ptr++,
        G_RM_AA_ZB_OPA_SURF, G_RM_AA_ZB_OPA_SURF2);

    // reset any rendering flags set when drawing the previous primitive
    gSPClearGeometryMode(gfx_list_ptr++, 0xFFFFFFFF);

    // enable smooth (gourad) shading and z-buffering
    gSPSetGeometryMode(gfx_list_ptr++,
        G_SHADE | G_SHADING_SMOOTH | G_ZBUFFER);

    // actually draw the triangles, using the specified vertices (front)
    gSP2Triangles(gfx_list_ptr++, 0, 1, 2, 0, 0, 2, 3, 0);

    // back
    gSP2Triangles(gfx_list_ptr++, 5, 4, 7, 5, 5, 7, 6, 5);

    // right
    gSP2Triangles(gfx_list_ptr++, 6, 5, 1, 6, 6, 1, 2, 6);

    // left
    gSP2Triangles(gfx_list_ptr++, 0, 7, 3, 0, 0, 4, 7, 0);

    // Mark that we've finished sending commands for this particular
    // primitive. This is needed to prevent race conditions inside
    // the rendering hardware in the case that subsequent commands
    // change rendering settings.
    gDPPipeSync(gfx_list_ptr++);
}
This code is part of an example that renders spinning box:
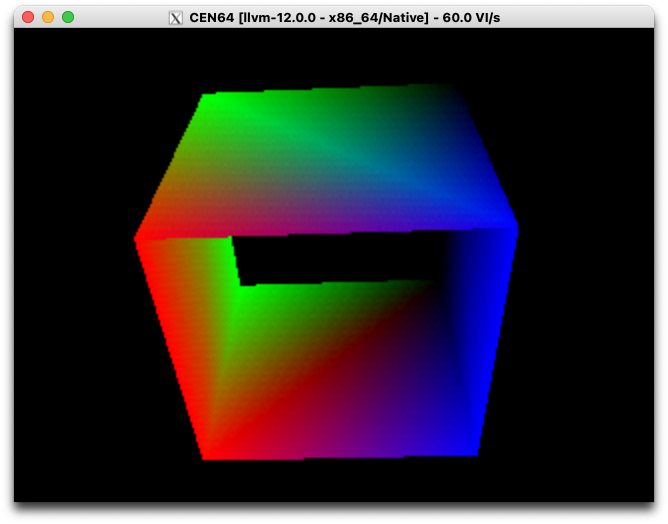
You can see that for the gDP and gSP API calls, the first argument is always a pointer into a Display List. This is post-incremented after every call, so that gfx_list_ptr points to the next empty slot in the Display List.
Audio
Audio is another case where the Nintendo 64 is a bit unusual. Whereas most home consoles would have a dedicated sound chip, or audio processing pipeline, the Nintendo 64 uses the RSP for processing audio. Similar to how Display Lists are used for graphics processing, the RSP uses Audio Command Lists for audio.
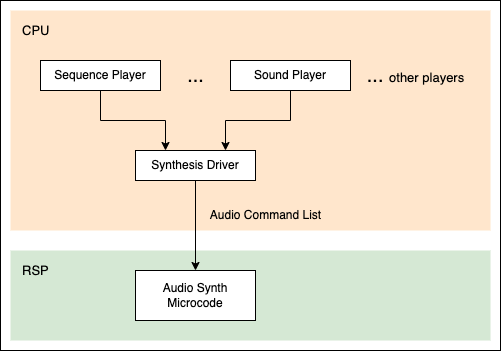
Audio can be thought of as a layered architecture, with the SDK providing ‘Players’ that are managed by the CPU. The output of these players is fed to a Synthesis driver that serialises this data in a format understood by the audio microcode running on the RSP.
Input
Cross-platform input handling required significant refactoring. Whereas the original code was event based, relying on the OS to publish input events on an event loop, the N64 expects programmers to poll for the current state of input devices.
To make this consistent across the N64 and desktop versions of the code, I chose to implement an input mapping scheme. This made it possible to map multiple platform-specific inputs to a single input ID/handle. The N64 input handling code used a brute-force approach, where all relevant inputs are checked once per frame. The game code was already based on a fixed time step, so this worked well, and the overhead did not cause performance issues.
Storage (Controller Pak)
There are two ways we can manage high scores. The first would be to store them in save stage on the cartridge, relying on SRAM built into the cartridge. The second is to store them using a Controller Pak, which would allow the save data to be transferred between consoles/cartridges. I opted for the Controller Pak approach.
This proved to be quite challenging, as the APIs for accessing the Controller Pak require certain initialisation steps to be taken before attempting to read/write from the Controller Pak. Failing to do so leads to unpredictable behaviour, sometimes even corrupting data on the Controller Pak. I spent more time on this than I would have liked, relying on printf debugging via the EverDrive serial connection to figure out what was going wrong.
As you can see from the following code snippet, just initialising the Controller Pak is quite intricate:
bool open_controller_pak()
{
    s32 ret;

    nuContPakCodeSet(COMPANY_CODE, GAME_CODE);
    nuContQueryRead();
    nuContDataReadStart();
    nuContDataReadWait();

    if (nuContStatus[0].status & CONT_CARD_ON) {
        debug_printf(" - nuContStatus says card is on\n");
    } else {
        debug_printf(" - nuContStatus says card is off\n");
        return false;
    }

    nuContPakOpen(&pak_file, 0);
    if (pak_file.type == NU_CONT_PAK_TYPE_PAK) {
        debug_printf(" - nuContPakOpen says card is controller pak\n");
        return true;
    }

    if (!nuContRmbCheck(0)) {
        debug_printf(" - nuContRmbCheck says card is rumble pak\n");
        return false;
    }

    debug_printf(" - nuContPakOpen error: %d\n", pak_file.error);
    debug_printf(" - nuContPakRepairId attempting repair...\n");
    ret = nuContPakRepairId(&pak_file);
    if (ret != PFS_ERR_NEW_PACK) {
        debug_printf(" - nuContPakRepairId failed: %d\n", ret);
        return false;
    }

    // try again
    nuContPakOpen(&pak_file, 0);
    if (pak_file.type == NU_CONT_PAK_TYPE_PAK) {
        debug_printf(" - repair successful\n");
        return true;
    }

    debug_printf(" - repair not successful\n");
    return false;
}
Haptics (Rumble Pak)
While it may seem crude now, Nintendo’s Rumble Pak was yet another example of the company’s willingness to experiment with new ideas (just look at the shape of the controller itself). Force feedback is now an expected feature in all modern game controllers.
The Rumble Pak requires 2 AAA batteries. Devices that take AAA batteries are typically designed to handle voltages from 0.9 to 1.5V. In practice, this could mean weaker feedback, but would not be a critical issue for the Rumble Pak. When discussing the need for AAA batteries with a friend, we guessed that this was to avoid using/straining the 3.3V that is supplied by the console.
It turns out that 1) it is possible to run the Rumble Pak without batteries and 2) this would be a bad idea when more than two controllers are fitted out with Rumble Paks:
- N64 Rumble Pak (Rumble WITHOUT batteries)
- Why did the Rumble Pak for the Nintendo 64 require batteries when it actually apparently doesn’t?
Driving the Rumble Pak was straightforward, using a simple API that allows game code to set the motor speed and duration for feedback events:
void rumble_start(float time, float intensity)
{
    const u16 frequency = 256.0f * intensity;
    const u16 frame = 60.0f * time;

    nuContRmbModeSet(0, NU_CONT_RMB_MODE_ENABLE);
    nuContRmbStart(0, frequency, frame);
}
It’s interesting to note that the N64 controller was ultimately limited by a half-duplex serial interface. This means that instead of separate wires/pins for each button, there is a single data wire that carries all data. The protocol used later become known as the Joybus Protocol.
Emulation
There are many challenges in N64 emulation. It’s not just a matter of emulating the CPU. The RCP and RSP also need to be emulated.
The RCP relies on microcode, which is driven using Display Lists. While this can be emulated on the instruction level, doing so is computationally intensive, even on modern hardware. It is more common to emulate the RCP at the microcode level, using what is known as High-Level Emulation (HLE).
UltraHLE was a great example of High-Level Emulation in action. This emulated achieved what was thought to be impossible - full speed N64 emulation on PC hardware. UltraHLE was designed to intercept C function calls, which were mapped to efficient implementations on the CPU, allowing games such as Ocarina of Time and Super Mario 64 to run efficiently on PC hardware in the late 90s and early 2000s.
While High-Level Emulation works well for many games, especially first-party titles, it falls apart when a ROM uses non-standard microcode, an example being Indiana Jones and the Infernal Machine and Star Wars Episode I: Battle for Naboo.
See this interesting write-up of the effort that went into reverse engineering some custom microcode that Factor 5 developed towards the end of the N64’s commercial lifespan:
As for more modern emulators, I used a variety for testing:
- CEN64 (macOS and Linux) - I had to build this from source, but fortunately that is not difficult to do. Running a ROM will require a BIOS file called
pifdata.bin. This is easy enough to find online. On macOS you will also need to install XQuartz. - sixtyforce (macOS) - A nice no-frills emulator that has good speed and compatibility. Registering is optional, but is nice to do if you want to unlock save state support and remove the watermark.
- Project64 (Windows) - A solid Windows-based emulator, with strong support for debugging, a highly configurable emulation.
Dev Environment
There are a number of options for setting up an N64 development environment. If you’re comfortable using the original Windows SDK, this can be obtained from ultra64.ca:
There are several options for how you actually install and use this SDK. Some people choose to use a Windows XP or Windows 2000 VM. I found that it was more practical to install the SDK via WINE, running on a Linux VM.
Unfortunately, using WINE is no longer viable recent versions of macOS, due to the removal of 32-bit support.
Exactly how you set this up will depend on your desktop environment, etc. So my recommendation is to find a tutorial on YouTube that is suited to your setup.
Modern SDK
If you’re using Linux, then another good option is to use CrashOveride95’s Modern SDK. This Linux-native SDK uses an up-to-date version of GCC, making significantly more sophisticated optimisations available. It also gives you the ability to use more modern C features.
For my development environment, I was able to install the Modern SDK on the same Linux VM that I used for the official SDK running on WINE.
Hybrid Approach
Unfortunately, these two SDKs have different requirements as far as Makefiles and build steps are concerned.
For this project, I wanted to support both SDKs, so I’ve included two Makefiles.
The code has also been written to compile without warnings with both SDKs. This meant adopting a subset of C that works with both SDKs, and is not precisely defind by a single standard. While this is not ideal for code readability, it makes it possible to compare the performance and behaviour of code compiled under both SDKs, which in itself is an interesting exercise.
Real Hardware
Of course, no homebrew project is really complete until it’s running on real hardware.
For this, I use an Everdrive-64 X7 flash cartridge. The console is connected to a regular HDMI monitor using a RetroTINK 2X-MINI, which you can see next to the classic Nintendo Yellow controller:
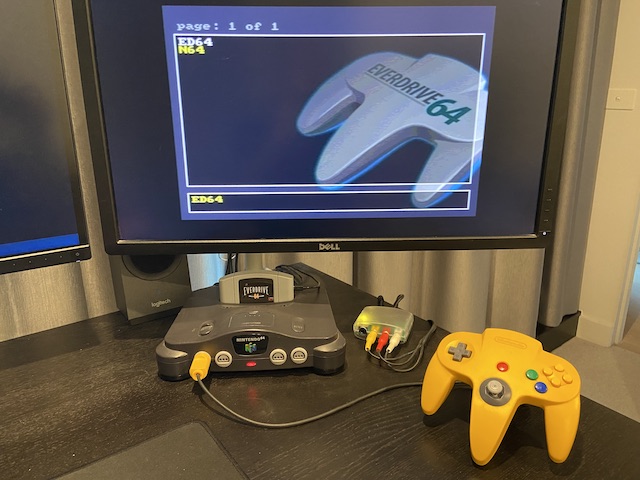
Not only does this cart support loading ROMs via an SD-card, tt also includes a USB interface, allowing ROMs to be loaded directly from a PC.
To upload ROMs via USB, I used buu342’s UNFLoader. The USB connection supports bi-directional communication, so it is possible to use UNFLoader for USB debugging.
N64 Operating System
Earlier consoles, such as the SNES or SEGA Mega Drive, often expected programmers to work directly with the hardware. Game code would be written in assembly language. While common assembly routines would often be provided as part of a development kit, the programmer was ultimately responsible for all aspects of the system. In some cases, specially customised cartridges would be used to enhance the capabilities of the console (e.g. the Super FX chip used in Star Fox).
The Nintendo 64 offered a more modern approach. The official SDK provides a set of APIs, targeting the C programming language, that together constitute the Nintendo 64 Operating System. The N64 OS was small enough that it could be embedded in a ROM, requiring only a tiny amount of valuable ROM space. The OS provided APIs that address the following concerns:
- Concurrency and message passing
- Process/thread scheduling
- Register and I/O access
As you can see, this does not include graphics or audio!
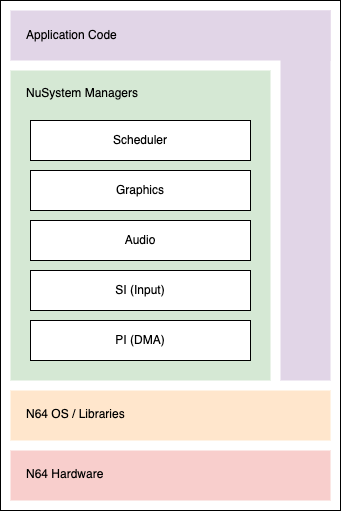
NuSystem
In practice, the N64 Operating System presents an extremely challenging development environment, so Nintendo also provided a set of higher level APIs for controlling the hardware. These are collectively known as NuSystem, often shortened to NuSys.
As an example of the functionality included in NuSys, these are a some of the functions provided for interacting with a Rumble Pak:
/**
 * Initiates operation of the Rumble Pak
 *
 * contNo   the Controller number
 * freq     the vibration frequency (1 - 256) where 1 is one pulse emitted
            every 256 frames and 256 is continuous movement
 * frame    the duration of the vibration in number of frames
 */
void nuContRmbStart(u32 contNo, u16 freq, u16 frame);

/**
 * Sets the operation mode of the Rumble Pak
 *
 * contNo   the Controller number
 * mode     the Rumble Pak operation mode
 *
 * valid modes:
 *   NU_CONT_RMB_MODE_DISABLE for disabled
 *   NU_CONT_RMB_MODE_ENABLE for enabled
 *   NU_CONT_RMB_MODE_AUTORUN for automatic recognition
 */
void nuContRmbModeSet(u32 contNo, u8 mode);
All functions in NuSys are prefixed according to the subsystem they apply to. As you can see in the code snippet above, functions for working with the Rumble Pak are prefixed with nuContRmb.
It’s worth noting that the N64 OS and NuSys components are not strictly layered here. It’s entirely reasonable for a game to make use of NuSys, while still interacting directly with the N64 OS, when greater control is required.
Display Lists
As mentioned earlier, graphics on the N64 is based on Display Lists (and in the case of audio, Audio Command Lists). This is how tasks are passed from the CPU to the RSP. This allows for a high degree of concurrent processing, whereby the RSP can process graphics and audio tasks while the CPU works on preparing subsequent tasks.
To help illustrate this, I’ve prepared a sequence diagram. This shows how tasks move from the CPU to the RSP, making use of shared memory:
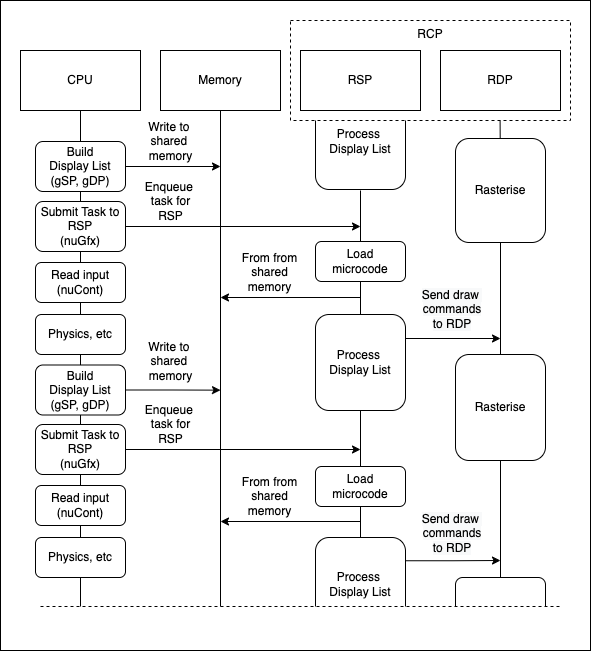
We can also see that the result of RSP processing a graphics task is a stream of low-level draw commands that are sent to the RDP. This is what drives rasterisation.
The use of shared memory is an important consideration here. As mentioned earlier, the N64 has a Unified Memory Architecture (UMA), which means that the same memory is used by the CPU and RCP. The RCP actually serves as the memory controller for the N64, mediating access to system memory.
When writing graphics code for the N64, it is important to recognise that the RSP is actively reading from the same region of memory used to prepare a Display List. Only when the RSP has completed a task can that memory be used for another task.
Sound Tools
There are two ways to prepare audio for inclusion in a ROM - one is to use the Windows-based Sound Tools, and the other is to use command line tools. After converting existing sound samples into a format that could be included in an N64 ROM, I battled with the Windows-based Sound Tools to marshall these into a form that could be embedded in a ROM.
For all of this, I used the Sound Tools running on Linux, via WINE:
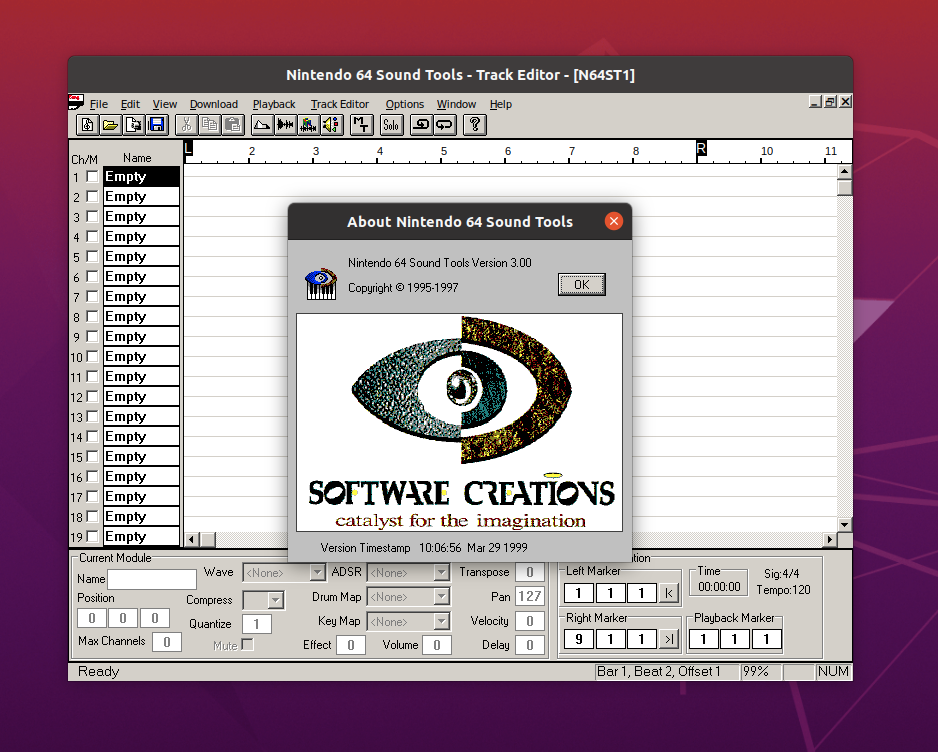
Check out that version timestamp!
My experience with the Sound Tools is that they’re incredibly painful to use. Clicking in the wrong location can easier do something completely unexpected. There are command line tools available, and I plan to use those next time I take on a N64 homebrew project.
Closing Thoughts
One of the interesting things to come out of this project is that the structure and quality of the code is better now than it was before I attempted to port it. All of the graphics code needed to be updated, after being modularised as a generic canvas API. The new API can be used to draw simple shapes, including the traditional Asteroids font.
Audio is still lacking in many ways. With the differences in how audio is handled on the N64 (versus SDL_mixer 2.0), it wasn’t clear how I could modularise this in the same way as the graphics/canvas APIs. The main reason for this is that audio files are embedded in the ROM via the linker, whereas the desktop version loads WAV files from disk.
Overall, I’m keen to pick up another N64 homebrew project at some point, next time making use of the 3D capabilities of the console.